Making my home 2% smarter – Part 3
As I mentioned before in Part 2, configuring Home Assistant through its configuration files requires you to know a bit about YAML. Unfortunately, replacing spaces with tabs will cause you no end of grief. Additionally, while not all of this is linearly coherent (as in, I went back and adjusted how I do things after I initially got started), I feel that this order makes it more user-friendly to work with.
First Time Login
I don’t want to go too deep into the first time login practices for the Hassbian image. In fact, there is some excellent documentation over at the Raspberry Pi foundation that should be relevant for any version of the Hassbian image. A few things I do want to recommend specifically are setting up the pi user password, and updating the installed software to the latest. These can be done by either console or remotely, logging in using the default credentials (username: pi, password: raspberry), and using the following commands.
Changing the password:
pi@hassbian:~ $ passwd
Changing password for pi.
(current) UNIX password:
Enter new UNIX password:
Retype new UNIX password:
passwd: password updated successfully
Updating the software:
pi@hassbian:~ $ sudo apt-get update
pi@hassbian:~ $ sudo apt-get upgrade
pi@hassbian:~ $ sudo reboot
Once that’s all done processing, and following the directions in the Raspbian remote access guides, you should be ready to begin working with your Pi. I like to throw in a reboot at the end of any major set of changes, to ensure that we’re running the software we just installed.
Getting into the files
Access to the configuration files can be had by using SSH to connect to your Raspberry Pi device and signing as the user pi. When I’ve done it this way, I often combined edit methods instead of jumping over to the homeassistant user, leading to frequent use of commands like:
pi@hassbian$ sudo vi /home/homeassistant/.homeassistant/configuration.yaml
pi@hassbian$ sudo systemctl restart homeassistant@homeassistant.service
pi@hassbian$ sudo tail -f /home/homeassistant/.homeassistant/homeassistant.log
That’s all well and good and all, but even using vim, which I’m comfortable with after all these years, doesn’t always play well with arrow keys while running on the Pi. So, what’s the best way to get access to the configuration? If you’re using a Windows machine, the answer is Samba, of course!
As it happens, the Hassbian 1.1 image comes with a pre-made samba configuration file in the usual place, /etc/samba/smb.conf. This is a default file, however, and not properly tuned to share any information out. It also, strangely enough, doesn’t appear to have Samba actually installed, so, before we can use it, we have to install it. We can do that by using the apt-get command.
pi@hassbian$ sudo apt-get install samba
Doing this will prompt for a whole lot of dependent packages to be installed as well. Enter Y when prompted and wait while the system goes ahead and installs samba. Once again, give the system a reboot using sudo reboot and wait for it to come back up.
Once complete, we have to configure samba before we can make use of it. This will likely be one of the few times that you will need to use an on-board text editor. Go ahead and enter the command:
pi@hassbian$ sudo nano /etc/samba/smb.conf
Scroll down to the end of the file and add in the following section
[Home Assistant]
path = /home/homeassistant/.homeassistant
browsable = yes
read only = no
writable = yes
allowed users = pi
force user = homeassistant
force file mode = 0744
force directory mode = 0755
Save and exit your editor (in nano, Control-X, Y for yes, and enter to confirm the file name). Before getting too far, you’ll need to set a Samba password for your pi user. That can be done by entering the following command:
pi@hassbian$ sudo smbpasswd -a pi
Enter your password:
Please Re-enter your password:
For me, I had some difficulty getting Samba to start, but once you reboot it after installation, set up the share, and added the pi user to Samba, then you should be able to make those changes active by restarting Samba by itself.
pi@hassbian$ sudo systemctl restart smbd
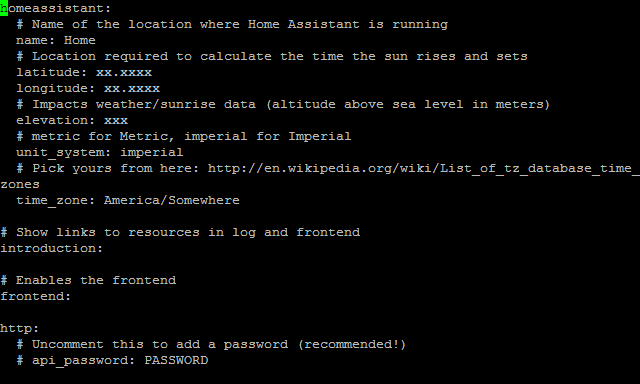
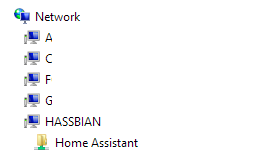
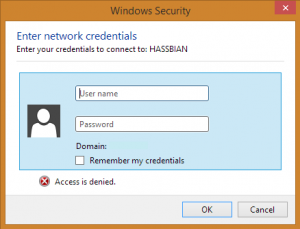
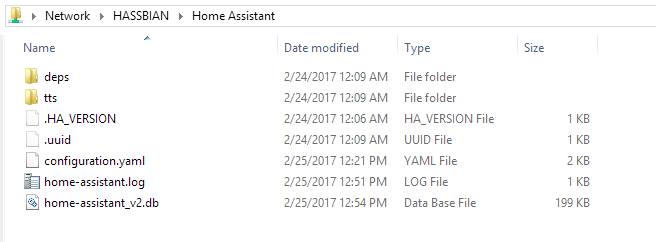
You should see success and, if you enter the command ps auxfw, you should see the programs smbd and nmbd running. Browsing your local network, or opening File Explorer and entering the UNC for your pi should first prompt you for a password (user: pi, password previously set), and then the Home Assistant share. With the settings we put in place, you can now open with your editor of choice (mine is Notepad++ thanks to it’s highlighting features).
Browsing the network:
Trying to access the Home Assistant share:
Success!
(To be continued in Part 4)